Write protection mechanism keeps the storage device from files being added, deleted or modified. When it allowed, addition or deleting of files become impossible, thus keeping all the files unaffected in the pendrive. The only thing you could do with is reading the files that already written to it.
No files can be added to pendrive means even the Virus cannot enter in to it. So your pendrive is safe from any type of virus attacks. This can be treated as the main advantages of write protection of pendrive.
Here in this tutorial I will explain about how to enable write protection on Pendrive. Enable write protection using registry is the method I chose here. Add the specified entry described below in registry and turn off write protection on pendrive.
How to enable Write Protection on Pendrive
Step 1: Open Registry Editor. (Open Run (Win+R), type Regedit and hit enter)
Step 2: Navigate to the following key
Step 3: Search for the key named as “StorageDevicePolicies“. If the key does not exist go to next step else skip the next step.
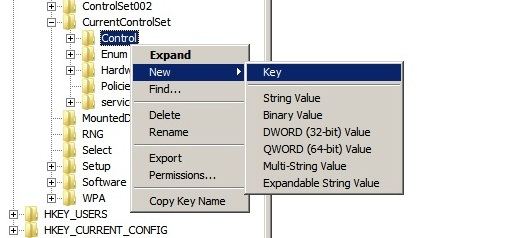
Step 4 : Right click on the Contol key, and select New >> key. Name it as StorageDevicePolicies.

Step 5 : Next write click on StorageDevicePolicies and select New >> DWORD (32 bit) Value and name it as WriteProtect.
Step 6 : Finally double click on WriteProtect and change the Value data field value to 1.
Recommended Posts:
Now write protection feature is enabled on your pendrive. Restart your PC to make this effect. You can test it by trying to make changes the files from it.
If you want to change it back to normal, just change the Value data to 0. Hope this tutorial helps you.


Appreciate the recommendation. Will try it out.